One Click Package and Deploy
Note: The One Click Package and Deploy feature is only available if you your own Steam ID and have access to the Steamworks backend. This does not work with the default Steam ID(480).
Overview
The One Click Package and Deploy feature allows you to package and deploy your Steam Builds with just one click. This feature is available for:
- Windows
- Mac (coming soon)
- Linux (coming soon)
Setup
Note: Please don’t gloss over the information on this page. If you plan to push your game to distribution, this step should not be taken lightly. Read what is written carefully, consider each warning and piece of guidance, and understand how the Unreal Project Launcher works, as this is what will be used to package your game.
To use the One Click Package and Deploy feature, you need to follow these steps:
Plugin Settings
Go to Edit > Project Settings > Game > SteamIntegrationKit and make sure the following settings are set:
- Steam App ID: Enter your Steam App ID.
Note: Don’t use your credentials if you’re not willing to share them with yours team members. It’s fine to use them for your solo project if you won’t be sharing access to your repository with others. As username and password will be stored in your repository.
In cases where you don't have a team account for pushing builds, consider using Environment Variables.
- Username: Enter the username of your Steam account OR the username of the Steam account that has access to the Steamworks backend.
- Password: Enter the password of your Steam account OR the password of the Steam account that has access to the Steamworks backend.
- Branch Name: Enter the branch name of your Steam build (e.g. live, dev, etc.).
- Build Description: Enter the description of your Steam build but you can modify it later in the Steamworks backend.
- Build Config: Select the build configuration (e.g. Development, Shipping, etc.).
- Maps to Package: Enter the maps that you want to package (e.g. Map1, Map2, etc.). If you want to override this setting, please scroll down to the Advanced Settings section.
Using Environment Variables
Note: The Username and Password can also be set in the Window's environment variables. If you set the SIK_STEAM_USERNAME and SIK_STEAM_PASSWORD in the environment variables, you don't need to set them in the plugin settings. On project restart, the plugin will automatically fetch the SIK_STEAM_USERNAME and SIK_STEAM_PASSWORD from the environment variables and show them in the plugin settings. This is helpful if you want to keep your Username and Password secure and do not want to push them to the repository.
Create Packaging Profile
On the main toolbar, click on SIK > Create/Reset Packaging Profile. This will create a new packaging profile for your project.

We use Project Launcher packaging profile to package your game.
You should now see a new packaging profile in the Packaging Profiles section and you can modify the settings according to your needs.
Note: Make sure you are familiar with the Unreal Engine Project Launcher. Changing settings in it can have a colossal effect, such as packaging your game with the Config folder containing .ini configs. Watch the tutorial on Project Launcher (opens in a new tab) and read the Epic documentation (opens in a new tab).
Note: To avoid your ini files being packaged including your uproject file use tick Store all content in a single file(UnrealPak) in Project Laucher SIKProfile settings. You can also choose to encrypt any ini files that Unreal Engine packages in advance cook settings. 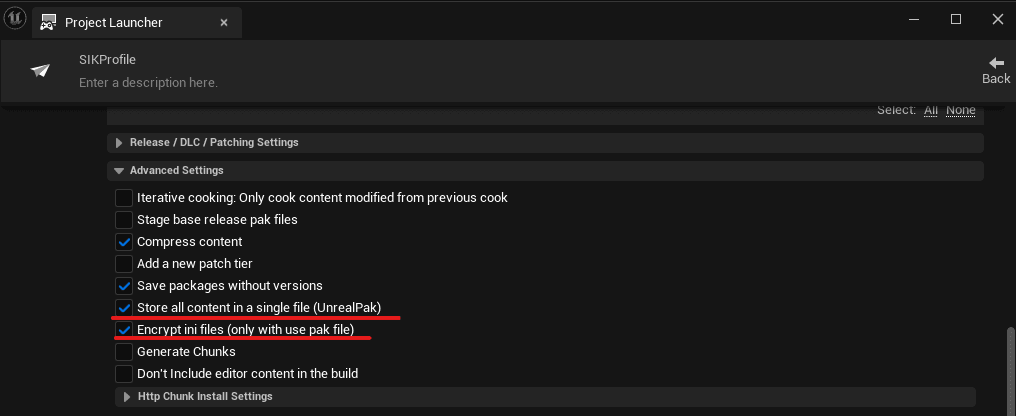
Login to Steamworks Backend
To generate a token for the One Click Package and Deploy feature, you need to login to the Steamworks backend.
On the main toolbar, click on SIK > Login to Steamcmd. This will open a popup window where you need to enter your SteamGuard code (if enabled) and then click on Login.

Please check the output log to see if the login was successful.
This is a one-time process and you don't need to login again unless you logout or the token expires.
Package and Deploy
Now we are done! To package and deploy your Steam Build, click on SIK > Package and Deploy. This will start the packaging process and you can check the output log to see the progress.

Packaging Size Issue
When you package your project normally, the size of the packaged build is usually lower than the size of the build that is packaged using the One Click Package and Deploy feature. This is because the One Click Package and Deploy feature uses the Project Launcher to package the build which requires additional modifications to decrease the size of the packaged build.
Initial Size through Normal Packaging: 0.98 GB

Initial Size through Project Launcher (SIK): 1.11 GB

Final Size through Project Launcher (SIK): 0.96 GB

Now, to decrease the size of the packaged build, you can follow these steps:
Step 1 - Open Project Launcher
For many, Project Launcher is a new concept. It is a tool that allows you to package your project with additional settings and modifications. It can be found in the main toolbar under Platforms > Project Launcher.
Note: Make sure you are familiar with the Unreal Engine Project Launcher. Changing settings in it can have a colossal effect, such as packaging your game with the Config folder containing .ini configs. Watch the tutorial on Project Launcher (opens in a new tab) and read the Epic documentation (opens in a new tab).

Step 2 - Open Packaging Profile
In the Project Launcher, you can see a list of packaging profiles that you or the One Click Package and Deploy feature has created. Press the Settings button to open the packaging profile for the SIKProfile.

Step 3 - Modify Settings
Basic settings like Cooked Maps under Cook form the core of sizing issues. You can modify these settings according to your project needs, such as including only the maps that your project uses for the client build.

Now, the main thing: to ensure the packaged build size is similar, you need to enable the Store all content in a single file (UnrealPak) option under Cook > Advanced Settings.

Note: This is your final warning: make sure Store all content in a single file (UnrealPak) is checked if you don’t want .ini files included in the packaged build.
That’s it! Now you can package your project using the SIK, and the size of the packaged build will be similar to that of a build packaged using the normal packaging process.